To fully benefit from CUDA, PG-Strom requires certain capabilities not provided by mobile chipsets. We have to equip our Mac with full-featured desktop version of an Nvidia GPU.
Thunderbolt to the Rescue
Luckily, most modern Macs are equipped with this awesome new technology, developed by Intel few years go. Its full potential might go unnoticed, as the majority of Apple users associate it almost exclusively with Thunderbolt Displays.
It is much more than a video output, tho. 20 Gb/s of bandwidth (soon to be doubled) makes is fast enough to act as a motherboard extension for powerful extension cards commonly found inside PC towers. For that we’re also going to need a case – my choice is a Sonnet Echo Express III-D.
In my case, it’s going to house a GTX 750 Ti. Not too much of a gaming monster these days, but good enough to give PostgreSQL a noticeable boost. Hardware installation is pretty straightforward, here’s what it looks like put together next to my Mac:
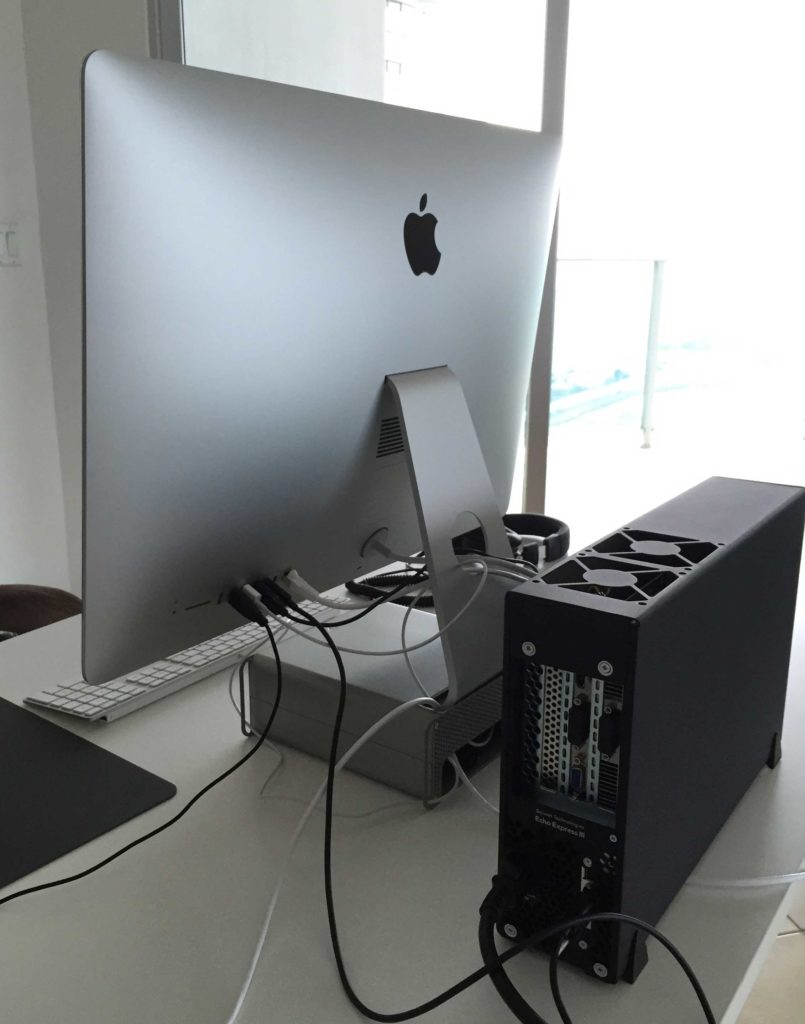
For CUDA acceleration, no display needs to be connected to the card (contrary to 3D gaming).
Plug and…
As I was about to find out at this point, hooking up the cables was the easy bit. Due to the fact that there were no Macs ever to ship with GTX 750 Ti, the card is not supported by OSX. There are so-called “Web Drivers” that Nvidia publishes, but they’re meant to be used with the pro-grade Quadro series.
To make things even more interesting, El Capitan has introduced the almighty System Integrity Protection, which prevents you from fiddling with core OS files even as root. And on top of that, the internals of 5K models are based on logical coupling of 2 display zones (because no single data bus can handle 5120 x 2880 at high refresh rate, apparently).
Alas, here comes a step by step guide on how to make it all work.
Step 1 – Disable SIP
First, check if you have the SIP enabled. It is turned on by default, but you might’ve disabled it in the past when El Cap was introduced because of legacy software issues:
➜  ~ csrutil status
System Integrity Protection status: enabled.
There it is – up and running. Let’s try to change that:
➜  ~ csrutil disable
csrutil: failed to modify system integrity configuration. This tool needs to be executed from the Recovery OS.
Not so fast – this cannot be done from a running OSX. I have to agree: it does make sense from a security point of view.
To boot into Recovery OS, you have to restart your Mac and hold cmd+R until the apple logo pops up. Once its loaded (it might ask for a language selection), from Utilities menu choose Terminal and try the command again – csrutil disable. You’ll get a message asking you to reboot again – do so.
Step 2 – Download and update the eGPU automate script
Luckily for us, all the dirty work of manually amending kexts and forcing Nvidia drivers to install has been done for us and comes in a form of a single script by goalque.
Let’s put it on the desktop:
➜  ~ cd Desktop
➜  Desktop curl -O https://raw.githubusercontent.com/goalque/automate-eGPU/master/automate-eGPU.sh
  % Total    % Received % Xferd  Average Speed   Time    Time     Time  Current
                                 Dload  Upload   Total   Spent    Left  Speed
100 37925  100 37925    0     0  43047      0 --:--:-- --:--:-- --:--:-- 98251
➜  Desktop chmod +x automate-eGPU.sh
At this point, if you happen to be using a 5K iMac, you will have to edit this file and change line 62 from this:
config_board_ids=(42FD25EABCABB274 65CE76090165799A B809C3757DA9BB8D DB15BD556843C820 F60DEB81FF30ACF6 FA842E06C61E91C5)
to this:
config_board_ids=()
If you don’t, you’re going to find yourself stuck with a 2560 x 2880 resolution (i.e. one vertical plane of the 5K combo).
Step 3 – Run the automator
The script has to be executed as root. Also, make sure your Thunderbolt cable is connected and the Video card powered up (fans spinning) before launching it:
➜  Desktop sudo ./automate-eGPU.sh
Password:
*** automate-eGPU.sh v0.9.8 - (c) 2015 by Goalque ***
-------------------------------------------------------
Detected eGPU
 GM107 [GeForce GTX 750 Ti]
Current OS X
 10.11.5 15F34
Previous OS X
 10.11.4 15E65
Latest installed Nvidia web driver
 [not found]
No Nvidia web driver detected.
Checking IOPCITunnelCompatible keys...

Missing IOPCITunnelCompatible keys.
Mac board-id found.
Searching for matching driver...

Driver [346.03.10f02] found from:
http://us.download.nvidia.com/Mac/Quadro_Certified/346.03.10f02/WebDriver-346.03.10f02.pkg
 Do you want to download this driver (y/n)?
y
  % Total    % Received % Xferd  Average Speed   Time    Time     Time  Current
                                 Dload  Upload   Total   Spent    Left  Speed
100 70.8M  100 70.8M    0     0  3890k      0  0:00:18  0:00:18 --:--:-- 3418k
Driver downloaded.
Removing validation checks...
Modified package ready. Do you want to install (y/n)?
y
installer: Package name is NVIDIA Web Driver 346.03.10f02
installer: Installing at base path /
installer: The install was successful.
installer: The install requires restarting now.
Checking IOPCITunnelCompatible keys...

Missing IOPCITunnelCompatible keys.

IOPCITunnelCompatible mods done.


All ready. Please restart the Mac.
It should recognize your GPU, download the Web Drivers from Nvidia, patch & install them, prepare the kexts and ask you to reboot. Do so.
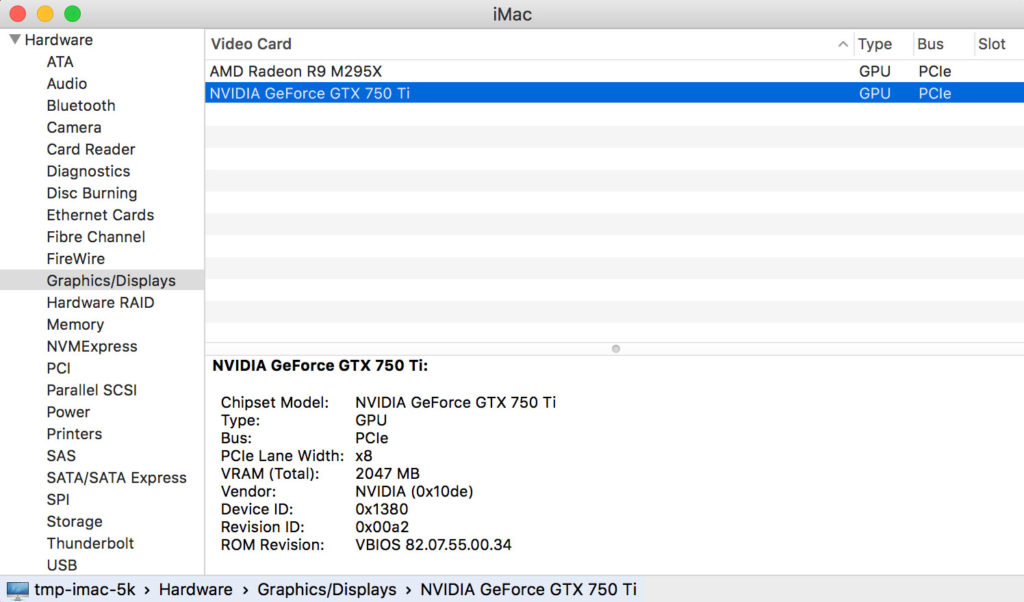
At this point, the card should be visible in System Report:
Back to PostgreSQL
With CUDA-capable card in place, PG-Strom should finally be able to use it. Let’s find out – if you followed my instructions to set up psql, there’s a handy tool called gpuinfo available in your postgres directory:
➜  ~ gpuinfo
CUDA Runtime version: 7.5.0
Number of devices: 1
--------
Device Identifier: 0
Device Name: GeForce GTX 750 Ti
Global memory size: 2047MB
Maximum number of threads per block: 1024
Maximum block dimension X: 1024
Maximum block dimension Y: 1024
Maximum block dimension Z: 64
Maximum grid dimension X: 2147483647
Maximum grid dimension Y: 65535
Maximum grid dimension Z: 65535
Maximum shared memory available per block in bytes: 49152KB
Memory available on device for __constant__ variables: 65536bytes
Warp size in threads: 32
Maximum number of 32-bit registers available per block: 65536
Typical clock frequency in kilohertz: 1150000KHZ
Number of multiprocessors on device: 5
Specifies whether there is a run time limit on kernels: 1
Device is integrated with host memory: false
Device can map host memory into CUDA address space: true
Compute mode (See CUcomputemode for details): default
Device can possibly execute multiple kernels concurrently: true
Device has ECC support enabled: false
PCI bus ID of the device: 196
PCI device ID of the device: 0
Device is using TCC driver model: false
Peak memory clock frequency in kilohertz: 2700000KHZ
Global memory bus width in bits: 128
Size of L2 cache in bytes: 2097152bytes
Maximum resident threads per multiprocessor: 2048
Number of asynchronous engines: 1
Device shares a unified address space with the host: true
Major compute capability version number: 5
Minor compute capability version number: 0
Device supports stream priorities: true
Device supports caching globals in L1: false
Device supports caching locals in L1: false
Maximum shared memory available per multiprocessor: 65536bytes
Maximum number of 32bit registers per multiprocessor: 65536
Device can allocate managed memory on this system: false
Device is on a multi-GPU board: false

Unique id for a group of devices on the same multi-GPU board: 0
It seem we’re in business! Let’s get some data to play with.
I often use a lazy man’s postgres on OSX which comes in a form of a Postgres.APP. One way to grab its databases and put them in our strom-enabled installation is to use pg_upgrade:
➜  ~ ~/postgres/bin/pg_upgrade -d ~/psql -D ~/postgres_data -b /Applications/Postgres.app/Contents/Versions/9.4/bin -B ~/postgres/bin
Performing Consistency Checks
-----------------------------
Checking cluster versions                                   ok
Checking database user is the install user                  ok
Checking database connection settings                       ok
Checking for prepared transactions                          ok
Checking for reg* system OID user data types                ok
Checking for contrib/isn with bigint-passing mismatch       ok
Creating dump of global objects                             ok
Creating dump of database schemas
                                                            ok
Checking for presence of required libraries                 ok
Checking database user is the install user                  ok
Checking for prepared transactions                          ok

If pg_upgrade fails after this point, you must re-initdb the
new cluster before continuing.

Performing Upgrade
------------------
Analyzing all rows in the new cluster                       ok
Freezing all rows on the new cluster                        ok
Deleting files from new pg_clog                             ok
Copying old pg_clog to new server                           ok
Setting next transaction ID and epoch for new cluster       ok
Deleting files from new pg_multixact/offsets                ok
Copying old pg_multixact/offsets to new server              ok
Deleting files from new pg_multixact/members                ok
Copying old pg_multixact/members to new server              ok
Setting next multixact ID and offset for new cluster        ok
Resetting WAL archives                                      ok
Setting frozenxid and minmxid counters in new cluster       ok
Restoring global objects in the new cluster                 ok
Restoring database schemas in the new cluster
                                                            ok
Copying user relation files
                                                            ok
Setting next OID for new cluster                            ok
Sync data directory to disk                                 ok
Creating script to analyze new cluster                      ok
Creating script to delete old cluster                       ok

Upgrade Complete
----------------
Optimizer statistics are not transferred by pg_upgrade so,
once you start the new server, consider running:
    ./analyze_new_cluster.sh

Running this script will delete the old cluster's data files:

    ./delete_old_cluster.sh
In this case, ~/psql is my Postgres.APP data directory. pg_upgrade leaves some script files around, which in my opinion could cause some trouble if run by accident:
➜  ~ rm delete_old_cluster.sh
➜  ~ rm analyze_new_cluster.sh
Let’s find out if all these efforts paid off:
➜  ~ pg_ctl -D ~/postgres_data start
server starting
LOG:  PG-Strom version 0.9devel built for PostgreSQL 9.5
LOG:  CUDA Runtime version: 7.5.0
LOG:  GPU0 GeForce GTX 750 Ti (640 CUDA cores, 1150MHz), L2 2048KB, RAM 2047MB (128bits, 2700MHz), capability 5.0
LOG:  NVRTC - CUDA Runtime Compilation vertion 7.5
LOG:  database system was shut down at 2016-07-10 14:21:25 EST
LOG:  MultiXact member wraparound protections are now enabled
LOG:  database system is ready to accept connections
LOG:  autovacuum launcher started
That’s it – we have our database engine using a GPU enclosed in a metal box plugged in with a thin cable. What a time to be alive!
Let’s connect to our database to ensure we’re talking to the appropriate daemon:

One last step to complete is to create pg_strom routines in our database:
➜  ~ psql mydb
psql (9.5.3)
Type "help" for help.

mydb=# CREATE EXTENSION pg_strom;
CREATE EXTENSION
A quick glance with DataGrip just to make sure:
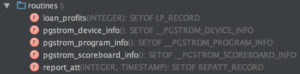
All systems go! Time to put all these CUDA cores to some use.
2 thoughts on “CUDA on Thunderbolt eGPU”